Posts

Showing posts with the label telescope accessories

Illuminated reticule eyepiece

Image
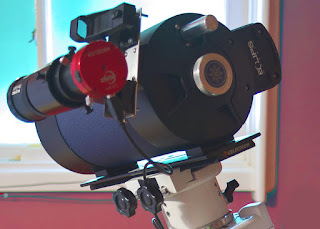
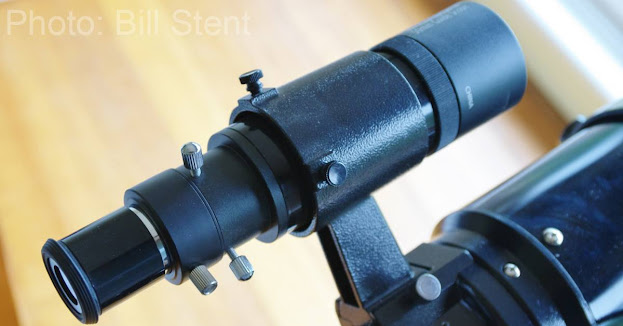
During the latest lockdown in Melbourne, I was at home, but had taken with me a small Newtonian telescope and a guide camera. I was wondering what sort of photo of Jupiter I could get with simple and inexpensive equipment. I put the scope up onto my NEQ6 mount, but it didn't have a finderscope. Complicating matters, the guide camera was set into the focuser of the telescope and it was nicely focused. I didn't want to move it. How was I going to see where the scope was pointed? How was I going to align the scope to the sky? Reusing old equipment I have an old guide scope at home - an Orion. It's not as good as the saxon one, but it does the job. I've also got an ancient illuminated reticule eyepiece which I rescued out a junk bin at an astro meet once. I planned to use this in the guide scope. The eyepiece was filthy. When I looked through it, all I could see was nicely-focused grit and dust across the whole field. I had to pull the eyepiece apart to c...

A two-night hike at Wilsons Promontory with the Zeiss Terra

Image
I love to go on overnight hikes with my daughter. It's wonderful to spend time with her just out in the bush. We always get on well, but on a hike, we really match and have a great time. The Norwegians have a saying " ut på tur, aldrig sur " (on a walk, you're never grumpy). Summer can be a good time for hiking, as long as it's not too hot, and fires aren't a hazard. The cooler months are better for non-alpine hikes, but because we both work, this was an opportunity to get out, so we took it. Our hike started at Telegraph saddle, and the first day was short, just down to Halfway Hut. From there we went to Roaring Meg and left our packs at the campsite, continuing to the Lighthouse and back with just a day pack. The third day was back to Tidal River via Oberon Bay. However, hiking isn't entirely without problems, though. I'm getting on a little, and Emma is much fitter and stronger than I am. I've had problems with knees and ankles before, and it ga...

Can you photograph the Moon through an off-axis guider?

Image
Something a bit different today. Occasionally we take great photos that we didn't expect. Often this comes about when something cool happens just as we're pressing the button, and sometimes it's chance. This time it happened when inner-city Melbourne-based Paul was focusing a camera attached to an off-axis guider (OAG). Paul uses a ZWO ASI120MM Mini guide camera on a Celestron OAG attached to a Celestron EdgeHD 1100 with Celestron 0.7X reducer. There's a mouthful! Like the Spanish Inquisition, nobody expects a photo through an OAG... but I'll allow Paul to continue: "I was struggling with focus on my guide camera. I had left my telescope set up after a night of failed attempts at autoguiding on Thursday night. The forecast for Friday was that it was going to cloud over, but around 8pm on Friday evening, the clouds hadn’t yet arrived and the Moon was just “there” waiting to be imaged! "I turned the mount on and selected “Solar System Al...

What's this bolt do? Saving your scope from disaster.

Image
Most high-end mounts attach to the telescope using a dovetail clamp. The telescope itself has a dovetail bar on it, which has a trapezium cross-section. This normally bolts to tube rings, which encircle the tube so they don't crimp it in any one spot, but some light tubes bolt directly to the dovetail. All you have to do is open the clamp on the mount, slide the telescope in so the clamp goes over the dovetail, and wind the clamp shut. Simple. The main advantage of having a clamp is that it keeps your scope parallel with the RA axis on the mount. It also doesn't scratch your dovetail bar. But are there disadvantages? I certainly never thought so. However, last time I was up at the dark sky site I was talking with far better astronomer than I, past ASV president, and general all-round good guy Russell Cockman. Russell was looking at my rig and brought up the subject of dovetail clamps. He asked me if I was scared of using one. This is my previous scope sitting on its mount...

Telescope magnification

Image
I get asked a lot of questions from a lot of people. All of these questions are good, but some are so good they get asked a lot. This is one of those questions. The magnification of a telescope is how much bigger your target looks compared to looking at it without the telescope. If you like, it's how much closer the target is going to look. Magnification is expressed in multiples, so if your telescope has a magnification of "50 times", it means that whatever you're looking at will look 50 times closer, or will appear 50 times bigger than without the scope. Remember that your telescope can have several eyepieces. Changing eyepieces changes the magnification. So, for watching the Moon, your 25mm eyepiece might give you just the view you want. However, if you want to look at Jupiter, all you get with a 25 is a dot, so you need more magnification. The 10mm eyepiece will give you a much closer image. But to calculate it, there's some mathematics involved. Your telescop...

Celestron RACI finderscope

Image
The other day I was contacted by James in Philadelphia who has just got himself a Celestron AVX800. A fine scope on a fine mount. But he’s having trouble with the 9x50 right angle correct image (RACI) finderscope. I had a look at the "straight through" one on our display model and yes, it’s fiddly. When you set up the scope each night, you have to true up the finderscope so that it's parallel with the main scope. To do this, you use the adjustment screws at the back of the bracket. This design is the "two screws" type - at 12 o'clock and 3 o'clock (see my side-by-side photo below). They work against a spring-loaded pin at 7:30 (which I've circled in the finst photo). Other finderscope designs use three screws spaced equally around the finderscope. To adjust the spring-type finderscope, all you have to do is twiddle the screws at 12 and 3 o'clock. You don't have to back off one screw in order to advance another, which you have to do with the t...

Taking a photo using a DSLR and small Newtonian reflector

Image
Focusing with a small Newt and a DSLR A slightly longer version of this is on the Optics Central blog page . One of the most common (and irritating) problems that owners of Newtonian telescopes have is getting a DSLR onto them – and actually get the image in focus. Well of course you want to take a photo! One of the most common (and irritating) problems that owners of Newtonian telescopes have is getting a DSLR onto them – and actually get the image in focus. Of course, people want to take photos of the Moon or other things when they’ve got a telescope and a DSLR – who wouldn’t? But actually getting the two things together is a little complicated. To make the physical connection, you need at least two things. First the telescope’s focuser has to have a specific thread (called a t-thread) cut into it. If your focuser doesn’t have one of these you can get a little tube with an eyepiece-shaped tube and the required thread. Second, you need an adapter called a t-ring, whi...

Off axis guiders

Image
You probably know that to get a good photo of a nebula through a telescope you need to use an exposure of a minute or more. This means your telescope’s mount needs to track the star – not just approximately, but precisely. There are some mounts that, once they’re set up correctly, will track beautifully. They do this by having high-tech sensors and magnetic drives which are near to perfect. The problem is that these mounts cost vast amounts of money. More reasonably priced mounts, like my NEQ6, are driven by gears. But even high-quality gears like this can’t be made perfect. Even if they're close, they get dirty, the lubricating grease moves around unevenly, or something else happens to the gears. As well, random wobbles occur. When this happens, the telescope shifts a tiny bit left or right, and it shows in your photo. For very wide-angle images, like those through a camera lens rather than a telescope, this is fine. But for telescopic images using high magnification scopes,...

Belt modification preparation

Image
25 December 2019 Merry Christmas to all our customers and readers! To everyone who's having a break over Christmas, I hope you all have a relaxing and safe time. To the rest of us, try to keep cool - it's been a hot start to the summer so far. This isn't great for astronomy, for a couple of reasons. First, hot weather makes for poor "seeing", with the atmosphere boiling away, causing light to be dispersed one way then the other, and ruining your view. It's like looking through heat haze, and you can see it in a little sequence I put onto our YouTube channel . The second reason why the hot start to summer isn't good for astronomy is the smoke. It's been a bad bushfire season so far, and looking through smoke haze doesn't make for good views. Incidentally, the heat isn't good for birds either. City birds will do all right, not being far from sprinklers and other water sources. But in the bush, the dryness and heat will really thin the...

How to use an intervalometer

Image
29 November 2019 The cheapest way of taking a photo through a telescope is using a mobile phone, normally stabilised using a phone adapter, such as the saxon ScopePix. This is a good start, but the next step in astrophotography is to use a DSLR. These attach to the business end of your scope using an adapter called a t-ring (this is a photo of mine). But then you've got a whole new set of problems. Every time you press the shutter button, you rock the scope slightly and it ruins the photo. And you want to take lots of photos so you can give them to your stacking software. And you don't want to be hovering over your rig all night, just pressing the button every minute or so. After all, we all need to sleep occasionally. What you need is a way of pressing the button without your having to actually be there. If only there were some gadget that does that for you. Of course there is, it's called an intervalometer, and it’s like an old cable release with a brain. Mo...

ASIair

Image
6 November 2019 Ever since autoguiding has been an affordable thing, really good astrophotographic images have been easier and easier to get. So what is that? Autoguiding is when you connect a second scope (normally something inexpensive) and a camera to your main scope. This takes photos of stars and sends them to a laptop, which locks onto a star. If the computer sees the guide star wandering even a tiny bit,   it sends correcting information back to the mount. Using autoguiding, as long as you've aligned your mount accurately, you can confidently move from 30 second exposures with nice round stars to 30 minute exposures or more. What's the downside? Urrgh, cables! Until I did some serious cable management, you could hardly see my scope under the cables. It looked like a plate of spaghetti. What's worse, they drag on the ground and catch on things as your mount tracks during the night. Nothing ruins a nice shot as effectively as a snagged cable. Enter the ...

Adrian Stanyer's Sculptor Galaxy

Image
9 October 2019 This is the best time of year for NGC 253, the Sculptor Galaxy. Here’s a terrific image taken by our mate Adrian up at the ASV’s dark sky site a couple of weeks back. I was up there on the same night. Adrian uses a saxon 200DS Newtonian, which he got from Optics Central about a year back. It has a pretty fast focal ratio of 5, which means it’s good for photography. It’s on a saxon NEQ6 mount he got at the same time. You can see it below. This alone is a great setup. But he's upgraded it. Adrian has a ZWO ASI294MC, a colour camera with a “four-thirds” size sensor, similar to a DSLR but more sensitive to near-infrared colours. The large sensor combines with the scope's 1000mm focal length to give a nice wide field - which is good for large nebulas. On top of this an IR cut filter helps with that awful “star bloat”. Since buying the mount and scope, Adrian has added a laptop computer, which can replace the mount’s hand controller. Having the computer also me...

Power supplies

Image
People ask us all sorts of questions about their scopes. Of course, the number one question is about polar alignment, but probably the second-most popular question is about power supply. Go-to mounts need power to slew (er, that's techy speak for "move around"), not only to find the target, but also to track it as you watch. More sophisticated setups will have cameras, dew heaters, auto-focus mechanisms, and all manner of geekiness. Sky-Watcher, saxon and Celestron mounts all require 12 volt power. They normally come with a cable that ends in a cigarette lighter attachment. The question people ask us is what to do with this? Well, you can set up your telescope near your car - which isn't such a bad option - but it's better to have a battery or power supply. A powertank - a large battery with some extra attachments - will power your scope and mount all night. You can get extra large capacity ones which will last up to a week if you're careful. What's ...

Finding focus

Image
18 March 2019 You might have noticed that telescopes, particularly small refractors, have multiple uses and configurations.  Mostly, of course, they're used as standalone telescopes. Normally they are used with a diagonals, but sometimes you don't want a diagonal in there. For example, you're trying to look at something near the horizon, or actually on ground. Or you're photographing through the refractor, including using it as a guide scope for autoguiding. This is where the challenge begins. Sometimes, if you take the diagonal off a telescope, and put the eyepiece directly in its place, or if you swap the eyepiece for a camera, you won't be able to get it to focus. In these cases, you'll need a spacer, which is a ring that simply adds distance between the focuser and the eyepiece. These two photos show instances when I've needed spacers. The first is for my main refractor, which wasn't shipped with a diagonal at all. In order to figure out how much spa...

Carina Nebula with a 127mm saxon FCD100 triplet refractor

Image
4 March 2019 This is another "you can do it!" post. If you've been following my Facebook posts, you will remember that I wanted to show what you could realistically expect from your own DSLR attached to a telescope, in a light polluted city. I took an admittedly large saxon FCD100 127mm refractor out into my front yard, got a reasonable polar alignment and started taking photos. I've already posted the photos I got of the Jewel Box. The photos I'm attaching this time are of the Carina Nebula. I think this is the second brightest nebula around after the Great Nebula in Orion, and it's in a good position to be seen right now, being high in the South (and above my neighbours' roof). The single shot I'm starting with was taken with a plain DSLR, 10 seconds at ISO 800. Out of the camera, there's really nothing much to be see, and a lot of people get turned off by this, or try to take a longer exposure, and this can run into tracking problems. ...

Finderscopes

Image
2 January 2019 One of the most common questions people ask us is "what's that little telescope on the side of the big telescope?" It's called a finderscope, and it's put there to help you aim your main scope quickly and accurately - or at least enough to get the object you're trying to find into the field of vision of your high-magnification telescope, saving you from hunting around and around. Bill's written a new blog on what the common types of finderscopes are, how to use them, and how to turn these things from dust collectors into time (and frustration) saving tools.