Posts

Showing posts from 2020

Chromatic aberration in binoculars - what it is, and how high contrast only makes things worse

Image
Chromatic aberration can have a significant effect on your binocular's performance, especially when looking at views with high contrast. it results in poor focus and colour fringing. This article explains what chromatic aberration is, and why high contrast makes things worse. When I'm talking about binoculars to customers, most often bird watchers, but also hunters, we often discuss how they might perform in high contrast environments. What, you may ask, are these? And why is it important? The answer is associated with chromatic aberration . A while back, I was out at Lake Acraman in the South Australian outback. We were out for geology, but of course, we were also looking for birds. Because we were in the desert, the sun was shining strongly, and the shadows cast by the trees are deep and sharp. My mate Dean had a pair of Vortex Razor binoculars - a magnificent tool. Being newer to birding, on the other hand, I had a far less salubrious pair - a stopgap while I saved

Identifying a bird from sonogram of a phone recording

Image
Back in May, I posted about spectrograms . This is a way of recording a bird call (or any sound, for that matter) in a visual way. You can think about it as a pianola roll, only much more detailed. With a bit of practice, you can actually read a spectrogram and "hear" the bird in your mind. You can even pick what sort of bird it is from the shape of the specrotrogram. Here's an example for you to guess. The other day, I was out getting takeaway when I heard a bird call. It's a bird that turns up each year now in Melbourne about this time. It used to be quite a rarity, but as the years get warmer, I'm hearing them nearly very year. It was not far away from me, and the background sound wasn't too loud, so I was able to get a recording on my phone with a reasonable signal-to-noise ratio. When I got home, I used Cornell University's free Raven Lite 2 software to convert my recording to a sonogram.  The sonogram As you can see, the main note - those four black

One of my first astrophotographs

Image
I was chatting to someone a few days ago, and the subject of old photos came up. I have very few: this one is from the late 1970s. At school, we had a 4" Unitron refractor on an equatorial mount. We could take photos of the Moon, but deep sky objects were beyond us. Apart from the cost, taking single, long exposures was supremely difficult. The longer the exposure, of course, the better the photo, but how do you keep the telescope on the target? To guide the telescope, a second scope was mounted on the main scope. This one had more magnification, and an eyepiece with a crosshair. The operator would peer through the eyepiece for the entire time, staring unblinking at a star. The operator would compensate for drift with the mount's slow-motion controls, but these were the only movements they could risk. If the operator lost the guide star, the photo would be ruined. Because of the long exposures, a wasted photo would cost of a lot of time. It was a terrible j

What's in the sky to look at - Summer solstice 2020

Image
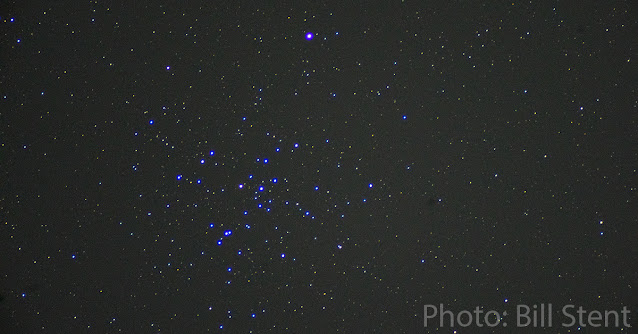
Today's summer solstice post is overshadowed a little by the Grand Conjunction between Jupiter and Saturn. I know you'll all be out watching that - weather permitting, of course, I wrote this post a week or so beforehand. After that, Saturn and Jupiter will go hiding behind the sun, but there are still plenty of things to watch in the sky, including Mars, which is still high, although it's beginning to get small as it moves away from the Earth. I've added a couple of clusters to my list this time. I got both of them from my light-polluted back yard a week or two back. This is my photo of M41, which I took from my back yard using a saxon 1021 doublet refractor of the type that many of you have bought for Christmas. It's very similar to our most popular refractor, the saxon 909AZ3, just a tiny bit bigger. I had it on a tracking mount though, my own NEQ6. This photo gives you an idea what you're likely to see with a small telescope. The photo also shows a fair a

Firearms versus telescope mirror!

Image
Telescope mirrors are delicate, right? Dust degrades your image, right? Can a bit of dust damage your mirror? So what happens when you shoot one with a gun? Reflector telescopes are a great way of getting some serious aperture onto a deep-space object like a nebula or galaxy. The 10-inch Dobsonians we have give a relatively inexpensive, no-nonsense and, frankly stunning view of those hard-to-see, dim fuzzies, especially from a dark sky location. New owners of reflector telescopes always ask me how often do they need to clean the mirror. They seem surprised when I tell them that with care, they probably won't ever have to. Mirrors, particularly large ones, are very forgiving. How's this for a case in point? The Harlan J Smith Telescope in Texas is a 107 inch Cassegrain (with a Caudé option as well, for the technical). To put that into perspective, the ASV's monster in Central Victoria is "only" 40 inches in diameter. On commissioning in 1968, it was the t

Padraic Koen's returning Hayabusa

Image
Padraic Koen posted this beautiful photo taken from the helipad at Arkaroola in South Australia. I often joke that my "office" is at the ASV's dark sky site in Heathcote, but Padraic's beats that by light years . It was at 3:59am on 6 December, and the camera, with its 11mm lens, was facing West-Northwest. Arkaroola is at the northern end of the Gammon Ranges, seriously isolated in the outback. The settlements of Copley and Leigh Creek are over 100km to the West-Southwest. These places produce pretty much zero light pollution, so the Arkaroola skies are about as dark as you'll get anywhere on the planet. There are a few things going on in this picture. First, the Moon was rising in the Northeast, out of frame to the right. This is shining gentle light onto the terrain, and the ten-second, ISO800 exposure picks out some features on the ground. This is pretty much my favourite part of the sky. At the top, Orion is dominating. Orion contains all sorts o

Magnification with a camera - why doesn't it really mean much?

Image
What's the deal with magnification? When using a telescope for visual observations, it's a simple matter to calculate how much bigger everything looks. But with a camera it's more complicated. Here, two concepts  replace magnification: your field of view and your camera's resolution. One of the most common questions people ask me is about the magnification on telescopes. For visual telescopes, it's actually pretty simple. The magnification is just the ratio of the focal length of the main mirror or lens to the focal length of the eyepiece you're using. So, for example, if you've got a telescope with a 900mm focal length, and you use a 20mm eyepiece, the magnification is 900/20, or 45 times. Swap to a 10mm eyepiece and the magnification jumps to 90 times. This is why shorter eyepieces are more powerful. But people also ask me about about magnification when you're using a camera. There's no eyepiece, so it's more complicated.  It's about fie

The death of the Arecibo Telescope

Image
Normally I don't comment on current events, but I thought I'd make a somewhat sad comment here. The Arecibo telescope, a 380m reflector dish located on the island of Puerto Rico in the Caribbean sea, has been destroyed. The dish of the telescope was built in a natural depression between hills. This not only made the construction a little easier, it also protected it from hurricanes (which were, of course, the eventual downfall - literally - of the facility). The dish itself was a spherical shape, rather than a parabola. This meant that the telescope could be aimed in a range of directions rather than being pointed at a fixed altitude and azimuth. To allow the telescope to be pointed, the array of receivers had to be above the dish and also had to be movable. After a few proposals for towers emerging from the centre of the dish, the designers settled on a receiver which hung over the dish on cables. The receiver itself moved under an inverted arch. This arch was suspende

Kelvin Hennessy gets a Snopes page!

Image
Fake video! Actually, not. But it was remarkable enough for some people to think it was a fake. We've featured one of Kelvin Hennessy's remarkable photos before . One of his favourite themes is an oversized moonrise with a terrestrial subject (often the Byron Bay Lighthouse) in the foreground. I think my personal favourite is the lighthouse with the Andromeda Galaxy rising behind. To achieve this effect, he gets a lot of distance between himself and the foreground. Because the foreground subject is very small and the whole shot is magnified by the telescope, the background Moon appears very large. In October, Kelvin made a new video, and published it on a couple of social media platforms. I've attached a few frames here, but the full video is well worth a watch. The reaction to the video was probably not what Kelvin was expecting, with accusations that it had been faked. One commenter said that the background Moon and foreground (lighthouse

Learning planetary photography - epilogue

Image
Well, my planet season is over. I've been teaching myself suburban planetary photography while I'm not able to get to the dark sky site. Planetary photography, I've found, is vastly different to deep-sky photography. Planets are tiny, bright targets, whereas nebulas are large and dark. My telescope doesn't have the magnification for it - the planet would be a dot. But it's not just that. The techniques are different too. To get a nebula, you need a very long exposure to pick up those dark details. Getting your equatorial mount to track the sky is paramount, and your polar alignment has to be nigh-on perfect. In contrast, planets are bright, and your exposures are measured in milliseconds, not minutes. At this speed, tracking means next to nothing. You can do it with an alt-azimuth mount, or even a Dobsonian. But it isn't easy. There are hidden lessons. Finding that I had to balance my focal ratio to the pixel sizes on my camera wa

Mike Kane's ISS photo (with an 8" Dobsonian)

Image
The International Space Station is now 20 years old. It orbits the Earth every 90 minutes or so, and while it doesn't go past everyone every time, there are quite a few opportunities to see it - as long as you don't live in Canada, Northern Russia or anywhere in Scandinavia. Mike from Port Macquarie got a fantastic photo earlier this month. It's the best one I've seen so far. I contacted Mike to find out how he did it. ... and you can take a photo like this yourself! The ISS is about 110 metres across. When it goes over soon after sunset or soon before sunrise, it stands out against a dark sky. If the light is at just the right angle, it can be brighter than Venus. The ISS moves at about the apparent speed of an airliner, but it makes no sound, and has no flashing lights. It's quite serene. But Mike's photo was a challenge. It's a bit like photographing an A380 from Melbourne while the plane is flying over Devonport in Tasmania! Mike uses an app called I

Jupiter and Saturn and the 2020 Christmas conjunction

Image
Something is coming up that you'll probably want to know about. Jupiter and Saturn are going to meet just before Christmas. Will it be the end of the world? A planetary conjunction is when two planets appear very close to each other in the sky (from the Earth's point of view). They're not particularly uncommon, mainly because planets don't stray far from the Ecliptic, which is a little like the Sun's equator. However, this one's going to be pretty special. On 21 December, just after sunset, Jupiter and Saturn will appear in the sky only one tenth of a degree apart. If you've got - meh - fairly dodgy eyesight like I do, you may not be able to tell they're separate. They'll be very close to the horizon in the South West. I've added a few screenshots from the free planetary software program, Stellarium, to show you what it's going to be like.  This wide field, showing the various constellations as well as the horizon will give you an idea

A quick review of the Leica Ultravid HD-Plus 12x50

Image
A very short review of the super-premium Leica Ultravid HD-plus 12x50 binocular Every so often we get to have a look at unusual or interesting equipment. The other day I was working at my desk when a colleague pushed a large black pouch into my hands and said "what do you think of these"? There was a single label on the pouch: Leica.  Leica Ultravid HD-plus 12x50 Inside I found a Leica Ultravid HD-plus 12x50 binocular. Normally I think bird watching when I consider binoculars, but a 12x50 makes me - at least - think of astronomy. I wasn't going to be able to test them for that though: the weather was cloudy for the next few nights. It was a pity - astronomy, with its pin-point stars spread over the whole field - is a real test of optical quality and sharpness. Heavy My first impression was that of weight. Of course, they were going to be heavy, but while they didn't let me forget it, they could have been heavier. I understand that the skeleton is made from magnesium a

Learning planetary photography - session 7 (back to the QHY5III 462C)

Image
I'm learning more about planetary photography now, including more about techniques and the software needed. I'm glad to say I'm less intimidated than before. Last session I captured 1000 monochrome Jupiter frames using FireCapture's region of interest facility. This was more frames than I had before, but after speaking with some experts I realised I needed more still to keep the speckly "noise" down. One expert suggested I use the QHY5III 462C camera, because it's less noisy, more sensitive and the pixel size was a better match for my equipment. As a rule of thumb, the pixel size in microns should be about one fifth your focal ratio. The pixels on the QHY5III 178M were a bit small. I set up the Celestron 8" SCT and the saxon 2" ED Barlow on my NEQ6 as before, only roughly polar aligning this time. I was less concerned about the planet wandering, as FireCapture had a trick up its sleeve, which I'll mention in a second. I also used the IR cut f

Ron Roper's Jupiter sharpening using RegiStax

Image
I know I've been posting a lot of planet photos of late. But we're getting late into planet season now, so I have to strike while the iron is hot. This isn't quite a planet imaging story, though. It's about image sharpening and how effective it can be. Sure, it's related, but it can be applied to any image - not necessarily planetary, and not even astronomical. Ron Roper has an Evolution 800 EdgeHD. He also uses a 2.5x Barlow with a ZWO ASI290MC planetary camera. He took an image of Jupiter, (a processed stack of the best 25% of about 6000 frames). As you can see, Ron's initial image is very impressive. You can see the Great Red Spot (GRS), and maybe just make out Io out to the left which is casting a shadow on the planet. But that was just the start. Ron was able to sharpen his image up. He opened it in RegiStax 6 - a free image processing package - and got to work. RegiStax uses something called wavelet sharpening. Wikipedia has an explanation of th

A look at the Sun, including the amazing Doppler effect

Image
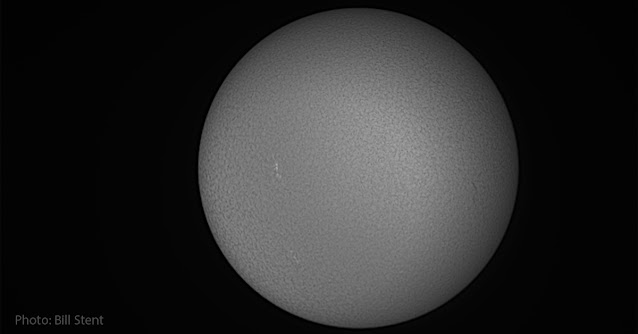
It's lockdown in Melbourne (still) and I'm looking for something to point a telescope at. I've sworn off deep sky targets for the time being, as the light pollution in the city here makes anything I produce - even narrowband - look blah in comparison to images taken from the dark sky site. I've also been taking photos of planets, but I left the Celestron 8 at work. Besides, (and I might be getting a little controversial now) there's a difference between nebulas and planets. Once you've taken a great image of a planet (not that I have yet) it gets a bit repetitive. There's not that many of them (sorry, Pluto). But wait - there's the sun! I pulled out my trusty solar telescope, a Coronado PST. This type of solar telescope doesn't work in the same way as a solar film filter. A solar film is an example of a neutral density filter, which turns down all the colours (frequencies) of light to more or less the same extent.  A solar telescope cuts out all

Learning planetary photography - session 6 (monochrome without filters)

Image
It was planet season, and I was learning about planetary photography, including all the details that go with it. For my last effort I'd used a mono camera, and found lots more things to get confused about. So I decided to keep things as simple. I stayed with the monochrome camera, but I didn't use any filters. I also decided to concentrate on Jupiter. There's so much surface detail that I can see straight away when my photos are going wrong. I busted out the scope, mount, Barlow and QHY5III 178M camera. The objective was to get a good exposure length - 30ms was too long, and 3 was too short. A bit longer would allow me to use a lower gain and get less of that speckly "noise". I wanted to learn about FireCapture's regions of interest (ROI). If you draw a box on the preview screen, the camera ignores everything outside this. This means the size of the image is smaller and it downloads faster, so you can take more photos in the available time. I polar aligned car

Donut day

Image
Jan and I went out this morning to do the shopping and found loads more people out than previous weekends. We celebrated by going to a cafe and actually sitting down to have a coffee and a donut. People seem to be optimistic and cheerful, and it's easy to understand why. Melbourne has been released from lockdown, and yes, we made a difference! Today was the third day of no new cases in less than a week. They're becoming known as donut days. It shows what humans can do if they work co-operatively, following sound advice from scientists and medicos and having clear rules and leadership to back it up. Because we weren't working in competition, this was something we did together. It was hard, and yes it cost a lot, both in terms of money and in terms of personal sacrifice, but looking at other countries, what's undeniable is we saved lives. We saved the lives of people we don't know, and we saved the lives of people we do know. It's just another difference between a

Flat frames - using a calibrating technique to find dust

Image
What's that madman doing this time? A few nights ago I was out in my back yard taking photos of planets. Using a monochrome camera and filters, I got a couple of images. They're not great, but that's another story. While I was out there, I noticed a problem. Jupiter had a big dark blob in front of it. The blob was about the same size as the planet, and roughly circular. Because Jupiter was a smallish image on the sensor, I was able to move my mount so that the blob didn't interfere with the image, but I suspected I had dust on one of my filters. Next morning, I looked at the filters and the camera. Try as I might, I wasn't able to see anything. Dust is a frustrating problem, especially for planetary photographers. With photos that use the whole frame, you can compensate for dust, but for tiny planets you can't do this. I decided to find it using the camera itself, by getting a "flat frame". This is a photo of what should be a blank featureles