Processing an LHaRGB image using monochrome and colour cameras, different pixel scales and Astro Pixel Processor
Nearly nobody reads these blogs, and so I’m going to write one which is pretty much for my own benefit.
I normally take notes about my workflow. I rarely actually follow them, normally getting distracted and going off on tangents, but in this case I was so out of my depth (I even needed help from a Dutch expert) I decided to figure it out beforehand, actually follow it, and record it here. Perhaps someone will benefit from the work I've done. Perhaps that person will be me.
If you’ve found this blog using Google, and you’re after the actual workflow, scroll down to the section called “processing the data”.
Finally, a chance for a photo
A couple of weeks ago I visited the ASV’s dark sky site. It was the first time I'd been there for a while (thanks to successive COVID lockdowns) and I was looking forward to taking a decent image. In the time, I’d taken other astrophotographs, but the aim of those was more as a test for equipment, rather than the image itself. No, this was a trip to try to get a photo.
Perhaps as a spoiler, the eventual photo isn't incredible. I mean, it worked out all right, but the amount of noise in the final image is significant enough for me to still want to go out and take another high quality image.
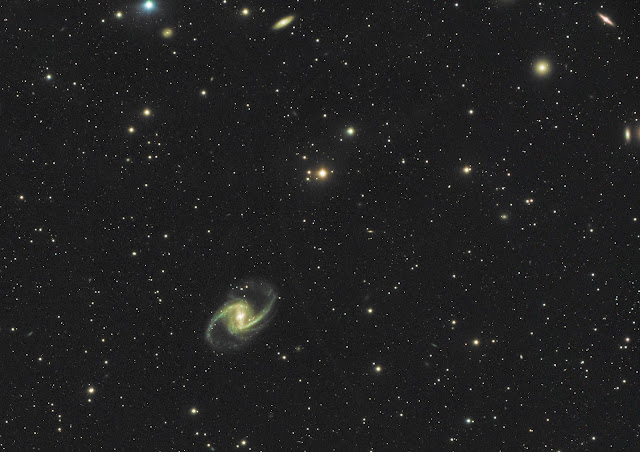
Due to the scarcity of nebulas at this time of year, I decided to get an image of a galaxy, and settled on NGC1365, the Great Barred Galaxy. It’s not an enormous target, so it was never going to fill my field of view, but I like the “small galaxy in a lonely sky” look. And it wasn’t going to be so small that I couldn’t crop it and get a reasonable blown-up image. There are also lots of tiny galaxies in the background of this particular area of the sky as well.
I wasn't keen on wasting my time, so I thought about how to maximise the number of photons captured.
I'd recently started working at Sidereal Trading, and I wanted to take some of their equipment with me to get more familiar with it - it's one thing to stand next to it in a showroom, but quite another to actually get out and take images.
Two separate rigs
So, getting a little ambitious, I decided to take two full rigs, and combine the output from them into the one image. The wonders of digital imagery.
First, of course, I took my own scope and mount. This is a triplet refractor, a SharpStar 107mm. It’s on a modified NEQ6 mount and shoots through a 0.8 reducer/flattener and filters to an ASI1600MM-P monochrome sensor. Each pixel sees about 1.4 arcseconds of the sky, and the camera’s field of view is about 1.81 x 1.37 degrees.

The second rig I took with me takes quite some describing. Buckle yourself in.
The scope is also a triplet refractor, a 102mm saxon FCD100. It’s a beautiful scope, slightly let down by the focuser. So, Diego designed and built an Astroworx focuser to replace it, and this version has a Pegasus focus motor (you can also run it with a ZWO EAF to ensure compatibility with ZWO’s popular ASIAir). The flattener (which does not change the focal length) is an Orion short refractor model. The guide scope is a Sky-Watcher, the guide cam is a QHY 5L-II-M, the main camera is a ZWO ASI071MC-P – a colour camera, and the whole mess is sitting on an iOptron mount – a CEM40EC. We call it Frankenscope. The only thing it’s missing is a bolt through the neck.
Here’s a photo of me setting up a test session some time before. One of the brilliant things about the iOptron mount is its cable management abilities – which I wasn’t using at the time. Sorry, but it’s a plate of spaghetti.

Each pixel sees about 1.38 arcseconds of the sky, and the camera’s field of view is about 1.89 x 1.26 degrees.
Photographically, these two rigs have their differences, but because of their similar pixel scales, they’re not a million miles from each other.
Two different rigs meant two different mounts, two different computers, two different computer hutches, extra cables, more power supply, etc. It got quite involved.
What was the output of these scopes going to look like?
Having two different rigs – especially with one colour and one monochrome camera - means that integrating the raw data was going to be complex.
The colour camera was going to be giving me raw files that had red, green and blue information all mixed in together. Knowing the Bayer pattern that the camera uses is critical to be able to unmix these three channels. The 071 uses “RGGB”, meaning a “colour” pixel is made up of one red, two green and one blue pixel all “binned” together.
The monochrome camera just gives me plain raw images. To determine what type of light it’s recording, it needs filters, which are in my filter wheel. (photo)
What sort of final image was I after?
I intended to get what’s known as an “LHaRGB” image, and in order to get the data I needed, I had to use a Hydrogen alpha filter for some exposures, and a Luminance filter (which lets through all visible wavelengths) for other exposures.
Hydrogen alpha (Ha) is a wavelength that emission nebulas are particularly bright in. These nebulas can shine like jewels, especially in the outer arms of a galaxy, but only if you’re using the right filter to find them. They show up in red, but they show up more using Ha. I intended to enhance the red information from the colour camera with the Ha information from the monochrome camera and express that combination as the red light in the final image. Without the Ha enhancement, the photo would be OK, just a bit flat without those enhanced nebulas.
In contrast to all this, the green and blue data that was coming from the colour camera was just going to go into the final image with little enhancement.
Finally, I was going to use a Luminance layer. This is not something I normally bother with, using a monochrome camera. It’s simply a high-resolution monochrome image showing how much light was hitting each pixel, regardless of colour. I use this to give me more sharpness than a colour camera is normally able to provide. This is not normally necessary in a monochrome camera because you’re not “binning” the pixels to record colour. Monochrome cameras are naturally sharper for this reason.
How was I going to combine all this?
I use a program called Astro Pixel Processor (APP) to process the raw data I get from my cameras. APP can combine data from:
- Images taken in different sessions including on different nights
- Images taken through different filters
- Images taken using different telescopes and cameras.
I'm very used to multifilter processing (after all, I've got a monochrome camera and so I normally use filters), and I've combined data from different sessions a couple of times, but I've never tried to integrate images taken with different scopes and cameras.
Getting the data
I’d already programmed Sequence Generator Pro on my two computers with what I wanted to get. I set up the scopes near each other (to share the power supply), polar aligned both, and set off the sequences. Because they were both on the same target, both scopes did meridian flips within a few minutes of each other. It was quite a dance, and it certainly had me busy for most of the night.
After each had finished, I used my lightbox to record calibration images (flat files to assess dust blobs and vignetting, and bias images to assess read noise). I’d already saved dark files for the monochrome camera, and I recoded darks for the colour camera the next day.
All up, I recorded about 16 Gigabytes of images on the night.
The next morning, I tore down both scopes, drove home, slept for a while, and thought about how I was going to process all that data.
Processing the data
Have a look at my overall workflow diagram.

I know it's pretty horrible, so I’ve broken the process down into six steps. As I was doing this, I also created a detailed script for a processing tutorial video, but I’m not sure if I’ll ever actually film it as I’m not sure I have anywhere appropriate to put it.
Step 1: Processing the monochrome images into calibrated greyscale stacks
This is the stage where I took the Ha and Luminance sub-exposures, calibrated, registered and stacked them. In the diagram, it's the top left hand corner - with the Ha and Lum light frames being calibrated with a number of dark and bias images (which work for both the Ha and Lum images) and flat frames (which are specific to each filter). These calibrated sub-exposures are then registered and combined into an Ha stack and a Lum stack.
In APP, I went to step 0 (RAW/FIT) and unchecked "force Bayer/X-Trans CFA", meaning the files I was going to get would be greyscale. Then I went to tab 1 (load) and loaded all the Ha and Luminance sub-exposures, the dark frames from my 1600’s library, the Ha and Luminance flat frames and the bias frames. Next, I went straight to tab 6 (integrate) and began the process. It took an hour or so.
Out of this I got two 32-bit greyscale images. These are Hydrogen alpha and Luminance, respectively. If you look closely, the Hydrogen alpha stack is darker, but highlights the bumpy bits inside the spiral arms.


Step 2: Processing the colour images into a calibrated colour stack
This is the top right hand corner of the workflow diagram. It's similar to the monochrome processing.
In APP, the process was similar to the previous step. I went to step 0 (RAW/FIT), but this time I checked "force Bayer/X-Trans CFA", meaning the files I was going to get would be RGB colour. Then I went to tab 1 (load) and loaded all the sub-exposures, the dark frames I’d taken from the 071 that morning, the flat and the bias frames. Then, I went to tab 6 (integrate) and began the process. It took another hour or so.
These combined to create one 32-bit colour (RGB) image.

The image is in fact colour, just not very saturated.
Step 3: Align (register) the three stacked images
If you look closely at the three images I’ve got, you’ll notice that the colour and monochrome photos don’t quite line up. There’s a bit of a lateral and rotational shift, because the telescopes were pointed to nearly the same target, the cameras were not quite on the same orientation. This does not pose a problem to APP.
This is the part in the diagram where the three stacks are aligned to produce three "registered" stacks. No other changes are made at this point.
I went to tab 1 (load) and cleared any files there and loaded the three stacks as light frames. I ticked “multi-channel/filter processing” but unticked “multi-session processing”. Then I went to tab 4 (register), unticked “same camera and optics”, and clicked “start registration”. This took a minute or so, but when it was finished, APP did not save the files as new copies, as it only saves the registration information. To save the new files, I clicked "save registered frames" at the bottom of the left panel.
The three images I now had are like the ones we started with (so I won’t show them) but they registered so they sit nicely on top of each other.
Step 4: Split the colour stack into channels
We now have three files: two monochrome and one colour. In order to enhance the red light from the colour image without harming the green and blue channels, we split the colour into three monochrome images.
In the workflow diagram, this on the right hand side towards the bottom
In APP, I went to tab 1 (load) and loaded only the registered colour stack as light frame. Then I went to tab 2 (calibrate) and and clicked "create Masters & assign to Lights". This did nothing at all! Next, I checked "split channels" and clicked "Save (calibrated) Light frames”. This saved the red, green and blue channels (respectively) in three separate monochrome files as I wanted them.


Step 5: Integrating the five registered stacks into the LHaRGB
So finally we have our five registered monochrome stacked images. We can use APP to recombine them into our desired LHaRGB image.
I had some trouble with APP in this stage, but I think I may have had a JPG file in there somewhere which confused the program awfully. It was asking me all sorts of questions about what channel goes with what filter. I had no idea until I realised I hadn’t loaded FIT files, which have the required filter information in the headers.
I went to tab 9 (tools) and clicked “combine RGB”. I selected the formula as LHaRGB 1 and clicked “add channel”. Carefully, I selected the five files I needed, and APP correctly figures out which filter they had been shot with and hence which channel they were contributing to. After that, I clicked “(re)-calculate” to render the image.
And here's the raw LHaRGB photo. It’s OK, but it needed a bit of additional editing to make it better.

There are all sorts of processing options available in Astro Pixel Processor, and I’m not going to go into them. I’m no expert in processing.
In the linear section, I normally remove light pollution and gradients, and calibrate the background and star colours. I’ll save this as a FIT file.
Then I move to the non-linear section and muck about with stretches and saturation. I’ll probably save that as a 16-bit TIF and finish it in Photoshop (you can use anything you like). I've also cropped it a bit more.
This is where the APP processing finishes, and the more subjective processing starts.

Step 6: Tweak in Photoshop
This is where you’re on your own!
For colour balancing, I'm a little colourblind and I normally use one round of medium-strength Hasta La Vista Green in Photoshop and leave it at that.
I’ll often sharpen it and reduce the noise - if it doesn’t ruin the details - and then crop as I want. Normally I don’t like to manipulate it too much. Of course, you can process it how you like.
So that's it!
It's not the best photo I've ever taken, and I'm not even sure I've improved it with my clumsy Photoshop noise reduction. It's not the first time this photo has been shown here either - I wrote up the process of actually getting the photo a couple of weeks ago.
However, that's not the point of this blog - don't look at the photo, look at the workflow!

Finally, thanks to Wouter on the Astro Pixel Processor forum for the help here. I really appreciate it!
Comments
Post a Comment