How to polar align a simple equatorial mount: a step-by-step guide (with pictures and a video)
More than anything else, people ask me about polar alignment of beginner equatorial mounts. To be honest, I'm not really sure that beginners need equatorial mounts at all, but that's how a lot of telescopes come. The process seems intimidating and hard to understand, but once you get the idea, it takes about five minutes and you're up and running - especially if you're putting the scope up where you had it last. In this rather lengthy blog (that goes with a video) I go through the stuff you need to know to get your equatorial mount set up, as well as a load of details you don't need to know, but might be helpful.
Before you start
Just to keep you on your toes - or maybe to balance the information coming from elsewhere, I live in Australia, which is in the Southern Hemisphere. I can't see Polaris, meaning the procedure might be a little different if you're up North. Some people say that polar alignment is easier in the North, I'm not entirely convinced, but it would be nice to have a bright star in about the right spot!
About equatorial mounts
Equatorial mounts are useful. They give you an extra level of functionality for pointing your telescope by allowing you, with the turn of a single knob (or press of a single button) to accurately follow the star as it drifts out of the field of view. You can keep your eye at the eyepiece with one hand on the slow motion control and never lose sight of your target. No more groping for that second slow motion control in the dark.
What's more, having the mount aligned in the same way that the Earth spins means the field you see does not rotate around the central star, like they do when you use an alt-azimuth mount. This means you can use the equatorial mount for astrophotography without the stars turning into streaks.
About this guide
This guide is all about simple equatorial mounts for telescopes. Because the same mount can support several different types of telescope, I won’t talk much about them. If you need extra help with your telescope, as against the mount, talk with your supplier.
These notes are pretty long - but don't be intimidated, the process isn't complicated or long. You don't have to read it all either, just the bits you need help with.
About the video
Note that this blog was written a while back when I worked at Optics Central in Melbourne, Australia. I no longer work there and have no control over the video. I believe that it will remain there indefinitely, but should it disappear I won't be able to put it back as I do not own the intellectual property. I should also add that the people at Optics Central are fine folks and I have no hesitation in recommending them.
This article also goes with a 15-minute video on the Optics Central YouTube channel. Have a look at it - it shows you the whole process from start to finish, and follows the same structure as these notes.
If you want a bit more instruction about how these mounts come out of the box, I opened a new one and showed off what you get as part of another video.
After you've watched these videos, you should be able to set up and align your equatorial mount. You can use these notes as a backup.
Step 1: Get to know your equipment
An equatorial mount looks complicated, but all it does is turn on four axes.
Two of these are earth-bound ones: "azimuth" (rotating left and right) and "altitude" (tilting up and down). These are the familiar axes that you find on conventional camera tripods.
The other two are related to the sky: "right ascension", or "RA" (what direction to move away from the celestial pole) and "declination" or "dec" (how far to move away from the pole in that direction).
The process of polar alignment only moves the azimuth and the altitude. Once it's aligned, you won't be moving those for the rest of the night. The axes that move during the night are the right ascension and the declination axes.
Here's my hand-drawn diagram of an equatorial mount here, showing these four axes.

Tip: to help you remember which axis is moving, keep an eye on the counterweights. When the mount's RA axis is moving, the weights will be moving. When the declination axis is moving, the weights don't move at all.
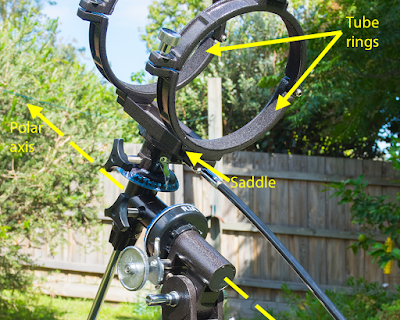
There are a number of other parts of the mount you'll be using. Here are some photos showing these parts.
Step 2: Choose a spot to set up
Choose a place where you are going to be viewing from. Back yards are popular places, mainly because they're close to beds and hot drinks. But I suggest you go camping out in the country. If you take your scope in the car you can enjoy some really dark skies.
Remember that the stars move in the sky as the Earth spins, so make sure you pick a spot so your target isn’t going to disappear behind a tree or a building in a couple of hours. You probably don’t what to have to move, because then you'll have to polar align again.
Tip: you can use a phone app like Stellarium, Star Walk 2, Sky Portal or any number of other apps to decide where to set up so that what you're looking at doesn't disappear behind a tree.
Step 3: Set up the tripod
Set the tripod up on as solid a footing as you can. Concrete is best, sand is worst. You don't want the telescope moving during the evening.
Level the tripod as best you can. I use a spirit level, which I put onto the top of the tripod before I put the head on. That way the spirit level has a flat plate to rest on.
Tip: you don't need to have the tripod set at its full height. probably the most stable height for the tripod is with the legs half extended, giving them a good amount of overlap. If you extend them to their maximum length, they can get a little wobbly.
Step 4: Put the mount head onto the tripod
The mount head normally gets folded into the most compact shape for packing in the factory. When you unpack it for the first time, you might find it's a bit complicated, so just unlock the clutches and the altitude clamp and take your time. You might find that it's best to leave it in its position at the end of the night, unless you want to pack it back into the same box. Leaving it as it was makes aligning much easier next time.
Once you've got the head unfolded, it goes on the top of the tripod. It gets fixed in place with a bolt that comes in from underneath.
Orient the tripod so that the polar axis (also known as Right Ascension or RA) is pointing roughly South (or North if you're in the Northern Hemisphere). We'll align it later so you don't have to be very accurate.
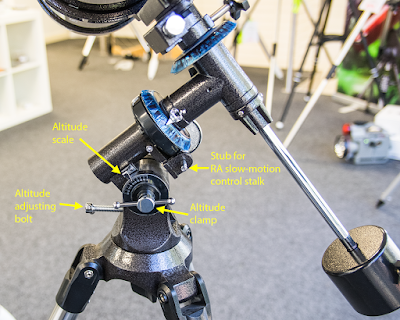
Insert the altitude bolt, make sure the altitude clamp is loose, and raise the polar axis to about your latitude. Again, you don't need to be accurate, we'll align it properly later on. Screwing the altitude bolt further in raises the polar axis.
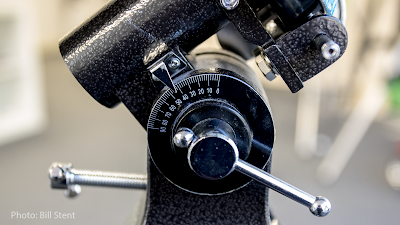
People often ask me about the circles with numbers on them. These are called setting circles and can be used to find stars from catalogues. You don't need to worry about them - nearly nobody uses them any more, these days you can find your target using phone apps. I think they keep them there because they look nice. This is a photo of the RA setting circle on an EQ2.

Step 5: Attach the counterweight and bar
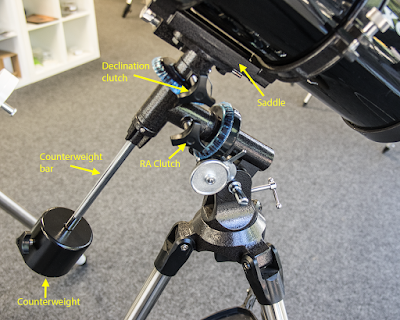
Equatorial mounts need a counterweight to stop the telescope falling to one side. The counterweight is installed on a long bar that sticks out from the Declination (Dec) axis.
Screw the bar into the Dec axis. Install it tightly but don't use tools or you'll have trouble getting it out later on. It doesn't need to be that tight. If you're setting up and you've left the counterweight bar in from last time, just check that it's still tight.
Slide the counterweight onto the bar and is fix it in place with the wing nut. To get it onto the bar you'll need to remove a small bolt and washer at the bottom of the bar. We'll balance the mount after we've put the scope on.
Tip: Always use the nut on the end of the counterweight bar. It's called a foot saver. Having a counterweight drop onto your foot would hurt. A lot.
Step 6: Attach the slow-motion controls
The slow-motion controls are for slowly moving your telescope in either the RA or Dec axes.
They're both on flexible stalks and connect to the mount on small stubs. You will get two, whether you get short ones or long ones will depend on what type of telescope you've got.
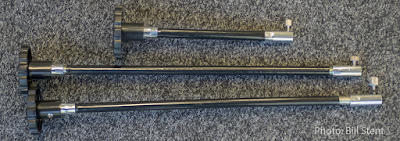
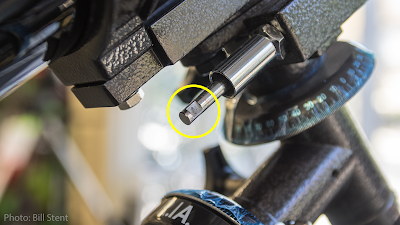
Loosen the thumb screw and slip the stalk over the stub, then tighten the screw over the flat facet cut into the stub. You can see one of the stubs (in this case the Declination control), along with its flat bit in the photo below.
Tip: When you're using the slow-motion controls, leave the clutches locked.
Step 7: Attach the tube rings to the saddle
The tube rings are round shaped brackets that open in the middle. They go around the telescope to attach it to the mount's saddle. There's a photo in the "getting to know your equipment" section.
The tube rings will be matched to your telescope, so they come in different sizes. They all have a bolt that goes through the mount saddle and into the tube ring, which is threaded. Tighten these with a spanner, but you don't need to over-tighten them.
Tip: Don't worry if you don't have tube rings, some telescopes don't use them. Instead, they can come with a dovetail bar which attaches to the mount's saddle using a clamp, or they may be bolted directly to the mount head.
Step 8: Lay the telescope in the tube rings
Now it's time to attach the telescope to the mount. Open the tube rings so you can lay the scope into the bottom half of the rings. Position the scope so it's roughly balanced in weight above the Dec axis. You'll adjust the balance more accurately later on.
Close the scope rings and tighten them down. You don't need to make it too tight, just as long as the tube isn't going to slip inside the rings. If you really over-tighten the tube rings you can crush the tube itself.
Tip: there are lots of different types of telescopes that come on the EQ1 or EQ2 mounts. Your scope might not attach using scope rings, in which case you'll have to do some experimenting.
Now your scope is fully assembled on its mount. Now it's time to balance it, or it might flop when you unlock the clutches.
Step 9: Balance the telescope
Remember that for visual work, the scope doesn't have to be perfectly balanced, just as long as it doesn't tip one way or the other is good enough. Balancing the scope will mean that you - or a motor - don't have to work too hard to move the scope using the slow-motion controls.
Tip: be careful if you unlock the clutches before balancing the scope. If it's not in balance it can fall one way or another, and this could damage your scope.
Step 9a: Balancing in Right Ascension
Unlock the RA clutch and rotate the telescope sideways so the scope and the counterweight are about level. It doesn't matter which side you put it on. Your task is to adjust the position of the counterweight so the scope and the counterweight are balanced.
Tip: If the scope side is heavier than the counterweight side, you have to move the counterweight further down the counterweight bar. If the counterweight side is heavier than the scope side, you have to move the counterweight further up the counterweight bar.
Step 9b: Balancing in Declination
Unlock the declination axis using the clutch. Rotate the telescope so it's roughly horizontal and leave the clutch unlocked. See if the telescope falls to one side or the other. To re-balance it, you'll have to loosen the tube rings and carefully slide the whole telescope up and down. Try not to move the mount or the tripod while you're doing this.
Tip: when you put different equipment on the scope, such as a large camera, you'll need to balance it again.
Congratulations, your telescope is set up and ready to align! But if you haven't done this before, it's time to...
Step 10: Get familiar with how the mount works
If this is the first time you've put it together, it's time to find out how the mount works. Let's imagine we've got our telescope set up. Point it to the South Celestial Pole - if you're standing at the South Pole, that'd be the part of the sky directly overhead.
If this isn't the first time you've set up your mount, you can probably skip this step.
Where's the South Celestial Pole? It's easy if you're in the Northern Hemisphere - there's a bright star very close by. Unfortunately, in the Southern Hemisphere, there are no bright stars nearby. Have a look at the star map below. The SCP is in the middle of the blue lines, about half way between the Cross and Pointers and the star known as Achernar.
Tip: at different times of the night and at different times of the year, the stars in this map will be in different positions, but the SCP will always be in the same spot.

Now, back to imagining we're standing behind a telescope that's pointing right at the SCP. In the image above, we're looking straight through the telescope (which is red). It's on an equatorial mount, with the counterweight pointing down and to the left. Imagine that the telescope is pointed straight along the RA axis - that is, the RA axis is also pointed right at the SCP.
Now, imagine we unlock the RA clutch. You can do this on your own mount if you like and see what happens. Be careful to make sure you've balanced the scope as in step 9, or the scope might fall. Now you can move the RA axis a bit. Notice that the counterweight rotates around?
Notice that no matter where you rotate the counterweight, the scope still points towards the Pole? That's because the scope is parallel with the polar axis. Moving the RA axis (that is, the counterweight) only determines which direction the scope is going to move in once we move the other (Dec) axis.
Let's try to point the scope to Achernar in the map above. To do this, we first move the RA axis so the counterweight points nearly straight down, but just a fraction to the left. Lock the RA clutch. Now unlock the Dec clutch and move the front of the scope to the right - it'll only move in a straight line at right angles to where the counterweight is pointing. That's why we pointed the counterweight nearly directly down, but a fraction to the left.
Tip: with equatorial mounts you have to stop thinking in grid squares and start thinking in concentric circles.
Finally, stars move around the Pole. In the Southern Hemisphere, they move clockwise. To keep the scope pointed at the same star, we have to slowly move the RA axis, but we don't have to change the declination at all. Many equatorial mounts come with a motor that does this for you. If the mount is properly aligned (as in the next step), and the motor runs at the right speed (or you move the slow motion knob just right), then the scope will follow your star just nicely.
That's the point of the equatorial mount!
Step 11: Align the mount with the Earth’s rotation
This step is known as polar alignment, and it really isn't as difficult as some people have suggested. It's a simple process of getting the mount (not the scope) correctly pointed.
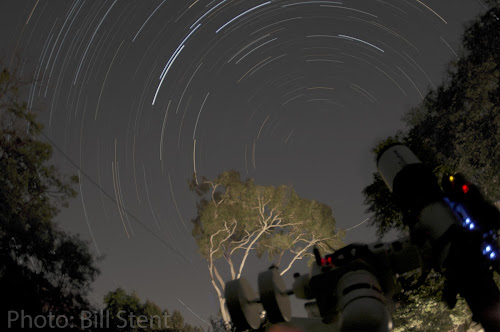
If you carefully watch the sky for a few hours at night, you'll notice that the stars don't actually rise in the east and set in the west. Instead, they rotate around a very particular spot. This is called the Celestial Pole. You can see the stars rotating around the pole in this long exposure photo I took from my back yard.
If you were at the South Pole, that central point would be directly over your head. I like to think of this as the Great Cosmic Kebab Skewer.
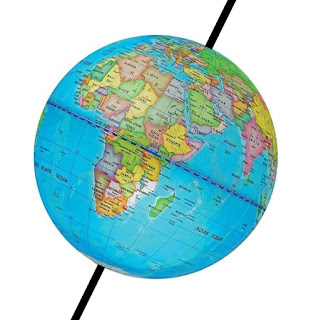
Everything in the sky (including the Sun, the Moon, the planets and all the stars) rise and set each day because the Earth rotates on its axis. This axis goes through the south and north poles.
Our task is in this step is to get the polar (RA) axis of the mount pointed in the same direction as the Great Cosmic Kebab Skewer. Once we get that done, we can rotate whatever telescope the mount is holding in the opposite direction so that the stars appear to stop moving.
If you look at the mount, you'll see that you can adjust the angle of the polar axis in two ways - left and right as well as up and down. The technical names for these are azimuth and altitude, respectively. Here they are in that diagram from before:

Tip: you'll notice that if you unlock the clutches, you can point the telescope any old place, but the polar axis remains still.
Tip: for visual work, we don't need to be too accurate polar aligned. Within a degree of two is fine. Astrophotographers with highly sensitive equipment need to be very accurate, but they have other ways of doing it.
Tip: if you want another discussion of this, have a look at another one of my blogs.
Step 11a: Adjusting the azimuth (left-right)
Your mount has to be oriented towards true due south (or north if you're up there). The easiest way of finding south is by using a magnetic compass. But in most places on Earth, true south (pointing to the actual South Pole) isn't the same as magnetic south. The difference is called "magnetic variation".
Tip: to find your local magnetic variation (also known as magnetic declination), go to https://www.magnetic-declination.com/ and click on your location on the map. It doesn't have to very accurate.
As an example, here in Melbourne, Australia, the magnetic variation is nearly 12°, and "positive", or east. That means that true due south is about 12° to the left of what the magnetic compass is telling you.
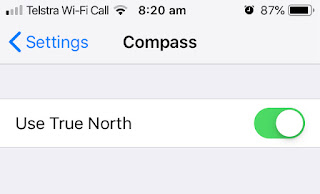
Tip: some phones allow you to set the compass to true North (and South) rather than magnetic. This helps a lot!
Step 11b: Adjusting the altitude (tilting it upwards)
What we need to do next is to organise the tilt of the polar axis to be the same as your local latitude.
Tip: you can find your latitude using a GPS. Your phone can probably also tell you your latitude.
Most equatorial mounts have a dial on the mount that indicates the angle above horizontal they’re pointing. These are normally accurate enough for visual astronomy.
If you want more accuracy, your phone might be able to help. If you have an iPhone find its inclinometer. Go to the compass app and swipe left. You may need to calibrate this or set the horizontal position. I think other smart phones also have an inclinometer.
The altitude adjustment bolt is opposite the counterweight. To prepare for adjusting the altitude, make sure the altitude clamp is loose.
With your phone sitting on a part of the mount that is parallel to the polar axis, wind the altitude adjustment bolt so that your inclinometer reads the same as your latitude (Melbourne is 37.8°S). If you’re not using a phone, watch the altitude dial.

Tightening the altitude adjustment bolt will raise the polar axis higher. Loosening the bolt will lower the polar axis. When you're done, tighten the altitude clamp.
Is the altitude on your mount set to your local latitude and your azimuth pointing due true south? If so, congratulations! You're polar aligned sufficiently for visual astronomy.
Step 12: Find your target
Once your mount is polar aligned, do not move the tripod or the polar axis of the mount. All you need to do is unclutch the RA and Dec axes to point the scope to your target.
The best and fastest way of finding your target is to use the finderscope. I've written about how to prepare your finderscope in another blog. Once your finderscope is aligned to the telescope, you can use the finderscope to point the telescope quickly at the target.
Unclutch both axes so you can point the scope by hand. While looking through the finderscope - not the eyepiece - move the scope so you can see your target in the crosshairs of the finderscope (or so the red dot is on the target if that's the type of finderscope you've got). Now lock the clutches and move to the eyepiece.
Tip: pointing scope on an equatorial mount to stars near the pole can be tricky - getting the RA axis pointed right to find the star is a knack that you'll get with a bit of practice.
If you use a map on your phone to find where the target is in relation to the pole you can figure out which direction the RA and the weights should point, and that'll help a lot.
With the widest-angle eyepiece (like a 25mm or more) you should probably see your target somewhere in the field of view. Use the slow-motion controls to get it to the centre of the field. These will allow you to keep your eye at the eyepiece while still adjusting the mount.
Tip: if you want a zoomed-in view, don't swap eyepieces to the high power one (probably a 10mm) until after you've got the target in the middle of the field with the lower power eyepiece. Remember that the target will drift away slowly, so don't take too long in changing eyepieces.
Step 13: Follow that star!
If you've done a good job with polar alignment, once your star (or planet, or whatever) is in the centre of the field of view, all you need to do to keep it there is twist the RA slow motion control. You probably won't have to touch the Dec control at all. This is the magic of the equatorial mount.
If you've got an RA motor, this is when you use it. The motor simply rotates the RA slow motion control at such a rate as the star stays in the field of view - just like you would have by hand. The better your polar alignment, the longer it will stay in view before you have to make adjustments.
Comments
Post a Comment